|
|
 |
I/S-2K adjustment procedure for A-1 machines with REV 2.x software
The REV 2.x revisions of the I/S-2K software provide adjustment means to set the needle speed,
the needle positioner's up and down positions, the needle return
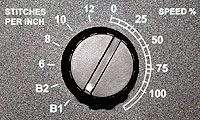
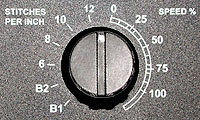
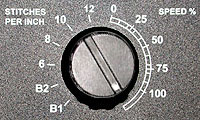
position of the regulated stitch and the constant speed range. The SELECTOR DIAL is used to
select the adjustment modes:

|
The LASER pushbutton is used to select between incrementing (red light on) and decrementing (red light off) an adjusted
parameter.
|
|
To enter the adjustment mode, hold the BLACK BUTTON down while powering up the unit.
|
|
A. NEEDLE SPEED ADJUSTMENTS
In this mode the needle speed for the needle positioner can be adjusted.
Note that the needle positioner speed adjustment will change parameters that affect the needle top position and
the constant speed range, so it should be performed first.
NEEDLE POSITIONER SPEED
- Turn the SELECTOR DIAL to its minimum (B1) position.
- Push and hold down
 .
A needle positioning step (up or down) will be made. .
A needle positioning step (up or down) will be made.
|
|
- Check the speed and strength of the needle movement. The proper setting should provide just enough strength
to stitch through the fabric going down and pull out going up without jamming.
Avoid setting the needle speed too high, for it may cause the needle to run over its top and
bottom position.
- If the speed and strength are sufficient, release
 , the
adjustment is completed. , the
adjustment is completed.
- If the speed and strength are not sufficient, while still holding down,
turn off the red LASER light if the speed needs to be decreased,
turn it on if increasing is necessary.
- While still holding down, hit
 . A beep
will indicate that the speed was increased/decreased and the new value was stored in the
computer's memory. A missing beep indicates that a high/low limit was reached. . A beep
will indicate that the speed was increased/decreased and the new value was stored in the
computer's memory. A missing beep indicates that a high/low limit was reached.
- Release and repeat the procedure from Step 2 until the
desired speed is reached.
|
REGULATED STITCHING SPEED
Does not apply to Needle Positioner
- With the SELECTOR DIAL still at the minimum (B1) position push and hold down
 . A fast single stitch will be made. . A fast single stitch will be made.
- Check the speed of the stitch. The speed should as high as possible without causing double stitching.
|
|
- If the speed is acceptable, release
 , the
adjustment is completed. , the
adjustment is completed.
- If the speed is not acceptable, while still holding down,
turn off the red LASER light if the speed needs to be decreased,
turn it on if increasing is necessary.
- While still holding down hit
 . A beep
will indicate that the speed was increased/decreased and the new value was stored in the
computer's memory. A missing beep indicates that a high/low limit was reached. . A beep
will indicate that the speed was increased/decreased and the new value was stored in the
computer's memory. A missing beep indicates that a high/low limit was reached.
- Release and repeat the procedure from Step 1 until the
desired speed is reached.
|
B. NEEDLE POSITION ADJUSTMENTS
A major improvement in the REV2.0 software makes it possible to eliminate the mechanical timing
and set the regulated stitch return position by software, similarly to the needle up/down positions.
The needle position sensor's timing is set at the time of the installation, there is no need to
re-time the sensor. It is recommended, however, to check the proper timing before the needle position
adjustment takes place.
To check the sensor timing:
- While watching the green light above the DOWN button turn the handwheel to the right direction very slowly until the light comes on. If the light just flashes, turn the handwheel backward until the light is on again. With fine adjustments of the handwheel the green light can be constantly turned on.
- If the green light stays on when the point of needle is just touches the fabric on its way down, the timing is correct, you can
proceed to the UP/DOWN POSITON ADJUSTMENT.
- If the green light is turned on when the needle is not at the desired position, the SENSOR ALIGNMENT procedure should be followed.
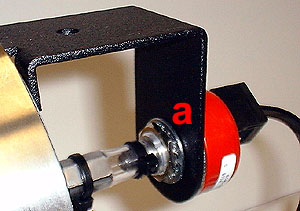
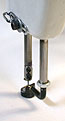
SENSOR ALIGNMENT
|
The needle position sensor is placed on the rear shaft of the
motor.
The sensor is mounted on a bracket by a 1/2" nut (a).
|
- Turn the handwheel to the right direction until the needle just touches the fabric on its way down.
- Loosen up the nut holding the sensor and turn the sensor very slowly watching the green light
above the DOWN button. If the light just flashes, turn the sensor backward until the light is on again. With fine adjustments of the sensor the green light can be constantly turned on.
- When the green light stays on the sensor is aligned properly. Tighten the mounting nut.
- Replace the cover on the needle position sensor.
|
UP/DOWN POSITION ADJUSTMENT
- Turn the SELECTOR DIAL to the 12 o'clock position.
- Push and hold down
. A needle positioning step (up or down) will be made.
To differentiate between the "up" and "down" positions a beep will sound when the needle is supposed to be at the "up" position.
|
|
- Check the up or down position of the needle.
|
When adjusting the "up" position, the take-up lever should be at this position to release the thread from the hook.
|
|
When adjusting the "down" position, the needle should stop at its lowest position.
|
|
- If the up(down) position is correct, release , and go to Step 1 to check the other position.
- If the up(down) position is not acceptable, turn on the red LASER light if the handwheel needs to be turned counter clockwise, turn off the light if the handwheel needs to be turned clockwise to reach the desired up (down) position.
- While still holding down hit . A beep
will indicate that the new position was stored in the computer's memory.
- Release and repeat the procedure until the
desired needle positions are reached.
|
Note that in some cases excessive overrun and occasional double stitching may occur during the up/down position adjustment. This may
be due to unnecessary high needle positioner speed. In such cases a repeated needle positioner speed adjustment is necessary to eliminate the effect.
NEEDLE RETURN POSITION ADJUSTMENT
Does not apply to Needle Positioner
- With the SELECTOR DIAL still at the 12 o'clock position push and hold down
. A fast single stitch will be made.
- Check the needle return position.
|
|
|
The needle should return to the top position with the take-up lever at the depicted position.
|
|
- If the needle return position is correct, release , the adjustment is completed.
- If the position is not acceptable, turn on the red LASER light if the handwheel needs to be turned counter clockwise, turn off the light if the handwheel needs to be turned clockwise to reach the desired needle return position.
- While still holding down hit . A beep
will indicate that the new position was stored in the computer's memory.
- Release and repeat the procedure until the
desired needle return position is reached.
|
Note that in some cases double stitching may occur during the needle return position adjustment. This may
indicate that the sensor is out of alignment. In such cases a repeated sensor alignment is necessary to eliminate the effect.
PRECISION NEEDLE RETURN POSITION ADJUSTMENT
Does not apply to Needle Positioner
Only REV 2.2 and higher
- Turn the SELECTOR DIAL to its maximum (100%) position.
- Push and hold down
. A reduced speed (precision) single stitch will be made.
- Check the needle return position.
|
|
|
The needle should return to the top position with the take-up lever at the depicted position.
|
|
- If the needle return position is correct, release , the adjustment is completed.
- If the position is not acceptable, turn on the red LASER light if the handwheel needs to be turned counter clockwise, turn off the light if the handwheel needs to be turned clockwise to reach the desired needle return position.
- While still holding down hit . A beep
will indicate that the new position was stored in the computer's memory.
- Release and repeat the procedure until the
desired needle return position is reached.
|
C. CONSTANT SPEED RANGE ADJUSTMENT
- With the SELECTOR DIAL still at its maximum (100%) position push and hold down . The motor will start running
continuously with the fastest constant speed.
|
|
- Check the full speed range by turning the SELECTOR dial while holding
down. Note that should be held
down continuously during the whole procedure.
- If the maximum speed needs adjustment, while still holding down,
turn off the red LASER light if the speed needs to be decreased,
turn it on if increasing is necessary.
- While still holding down hit . A beep
will indicate that the speed was increased/decreased. Repeat the procedure from Step 2
until the desired maximum speed is reached.
- While still holding down turn the SELECTOR DIAL to its minimum (B1) position. This is the slowest speed.
- If the slowest speed needs adjustment, while still holding down, turn off the red LASER light if the speed needs to be decreased, turn it on if increasing is necessary.
- While still holding down hit . A beep
will indicate that the speed was increased/decreased. Repeat the procedure from Step 7
until the desired slowest speed is reached.
- When both the slowest and maximum speed are acceptable release to save the adjusted speed range in the computer's memory.
|
|
After the adjustments are made the power should be turned off and on again to
start the unit in normal operating mode.
|

|
|
|